
Table of Contents
- What is iCollect Everything?
- Getting Started
- Navigating the App
- Adding Items to Your Collection
- Scanning by Collection Type
- Database Search In-Depth
- Viewing & Browsing Your Collection
- Editing Items
- Deleting Items
- Bulk Actions (Select, Edit, Delete)
- Using the Wishlist
- Switching Between Collections
- Creating Custom Collections
- Searching Your Collection
- Sorting Your Collection
- Filtering Your Collection
- Layout & Display Options
- Managing Images
- AI Features
- Customizing Your Experience
- Themes & Appearance
- Collection Value & Estimated Values
- Cloud Sync & Your Account
- Import & Export
- Sharing Your Collection
- Tracking Loaned Items
- Achievements
- Pro Subscription — Complete Guide
- In-App Purchases & Unlocking Collections
- All Settings Explained
- Frequently Asked Questions
- Contact & Support
1. What is iCollect Everything?
iCollect Everything is a powerful, easy-to-use collection database app that lets you catalog and organize virtually any type of collectible you can think of. Think of it as a personal digital inventory for all the things you collect — whether that’s movies, books, music, comic books, video games, trading cards, coins, stamps, action figures, toy cars, wine, LEGO, or dozens of other categories.

The app is for cataloging and organizing your collections — it does not play movies, stream music, or display digital copies of your items. Instead, it gives you a beautifully organized database of everything you own, complete with images, details, values, and more.
The app works on iPhone, iPad, Android, Mac, Windows, and the web, and your collections sync seamlessly between all your devices through free cloud sync.
Here’s what makes iCollect Everything special:
- 40+ built-in collection types — Movies, Books, Music, Comics, Video Games, Trading Cards (21 sports and specialty types), Action Figures, Coins, Stamps, Vinyl Figures, Wine, and many more
- Custom collections — Create your own collection type for anything not already covered
- Multiple ways to add items — Scan barcodes, use AI to identify items from photos, search our database, or enter details manually
- Free cloud backup — Your collection is safely backed up and accessible from any device
- Wishlist — Keep track of items you want to acquire
- Estimated values — Track what your collection is worth with automatic value lookups
- AI-powered features — Automatically identify and fill in item details using artificial intelligence
- Achievements — Earn badges as you build and explore your collection
- Powerful features — Deep customization with multi-level sorting, advanced filtering, bulk editing, layout options, customizable display fields, and much more to manage collections of any size
Renaming a Custom Collection
To rename a custom collection, go to the Switch tab, find your custom collection, and long-press (press and hold) on it. A menu will appear with the option to rename it.
2. Getting Started
First Launch
When you open iCollect Everything for the first time, you’ll see a Welcome Screen that asks you to pick the collection type you’d like to start with. The collection types are organized into categories:
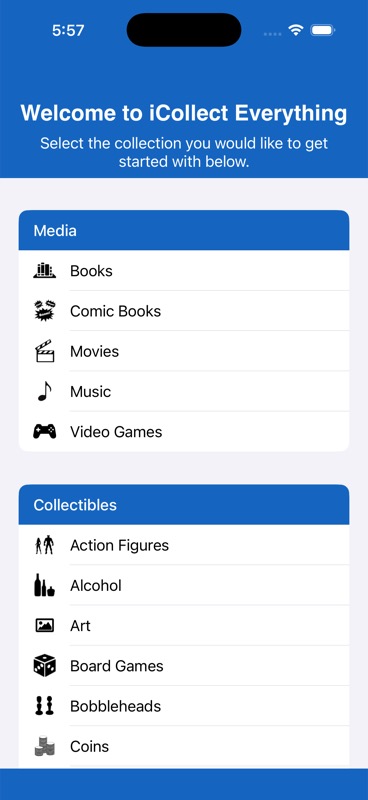
- Media — Books, Comic Books, Movies, Music, Video Games
- Collectibles — Action Figures, Coins, LEGO, Stamps, Toy Cars, Vinyl Figures, and many more
- Trading Cards (Sports) — Baseball, Basketball, Football, Hockey, Soccer, and more
- Trading Cards (Other) — Pokemon, Marvel, Star Wars, Yu-Gi-Oh!, Disney, and more
Simply tap the collection type you want to start with. Don’t worry — you can always switch between collection types or add more later! Some collection types may show “Coming Soon” if they are still being prepared.
The Quick Tutorial
After choosing your first collection, the app will show you a brief guided tutorial that highlights the most important parts of the screen with a spotlight effect. The tutorial will point out:
- The + button (top right) — for adding items
- The Search bar — for searching within your collection
- The Share button — for sharing your collection with others
- The Menu button (☰) — for accessing settings, sorting, filtering, and more
- The Collection tab — your main collection of owned items
- The Wishlist tab — items you want to acquire
- The Switch tab — for switching between different collection types
You can tap Next to go through each step, or Skip to jump right in. This tutorial only shows once on your first launch.
3. Navigating the App
The Tab Bar (Bottom of Screen)
At the bottom of your screen, you’ll see tabs that let you quickly jump between the main areas of the app:
Collection Tab
Your main collection of items you own. The icon changes based on what type of collection you’re viewing (e.g., a clapperboard for movies). A badge shows how many items you have.
Wishlist Tab
Items you want to buy, find, or acquire. Works just like the main collection but keeps your “want” list separate from your “have” list.
Switch Tab
Browse and switch between all 40+ collection types. Tap any collection type to switch to it.
Pro Tab
Shows Pro subscription features and upgrade options. This tab appears once you’ve unlocked unlimited items on at least one collectible type, and remains visible even after subscribing to Pro — serving as your hub to manage Pro features and settings.
The Side Menu
Tap the ☰ menu icon (three horizontal lines) in the top-left corner to slide open the side menu. This is your hub for all of the app’s tools and options:
- Log In — Create an account or sign in for free cloud sync (shows your account name when signed in)
- Collection Value — See the total estimated value of your collection
- Share Collection / Share Wishlist — Generate a link others can view online
- Settings — Customize the app (themes, display options, field visibility, and more)
- Layout — Switch between Compact List, Extended List, and Grid views
- Sort — Change how your items are ordered
- Filter — Show only items matching certain criteria
- Import — Import collection data from CSV files
- Export — Export your collection as a CSV spreadsheet
- In-App Purchases — View and buy collection unlocks, Pro subscription, and AI scans (hidden for Pro users)
- Restore Purchases — Restore previous purchases from your Apple ID (hidden for Pro users)
- Reload Collection — Force refresh your collection from the server and clear the image cache
- FAQ — Built-in help with 16 common topics
- Rate This App / Share This App — Support us!
- Like on Facebook / Follow on X — Connect with us on social media
- Contact Us — Email our support team (the app will first ask if you’ve read the FAQ)
- Change App Language — Opens your iPhone’s language settings for the app
- Account — Manage your account (visible when logged in)
- Achievements — View your earned badges and progress
- Privacy and Terms — View our privacy policy
4. Adding Items to Your Collection
Tap the + button in the top-right corner of your collection screen. You’ll see several options for how to add a new item:
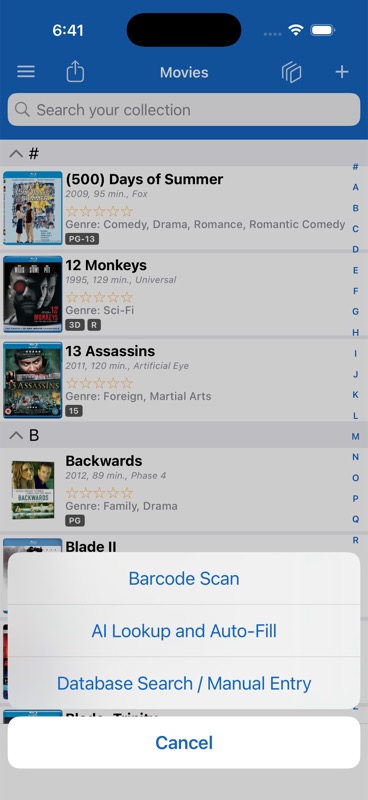
Option 1: Barcode Scan
The fastest way to add items! Point your iPhone’s camera at the barcode on your item (UPC, EAN, or ISBN).
- Tap +, then choose Barcode Scan
- Point your camera at the barcode on your item
- The barcode will be highlighted with a green border when detected
- You’ll hear a beep sound (if enabled in Settings) and the app will search our database
- If found, the item’s details and images are automatically filled in
- Review the details and tap Save
Helpful scanning features:
- Flash/Light — Tap the light button to turn on your camera flash for dark environments. The button turns red when the light is on.
- Manual Barcode Entry — If the camera can’t read the barcode, you can type the barcode number in manually
- Duplicate Detection — The app will alert you if you already have that item in your collection, giving you the option to “Add Another” copy or cancel
- Multiple Matches — If a barcode is shared by multiple items (e.g., a box set), you’ll see a selection list to pick the correct one
- Bulk Scan Mode — Toggle this on to rapidly scan one barcode after another without going back to the collection list between each scan. After each scan, a small card slides in showing what was saved (with the item’s thumbnail, title, and details). If the wrong item was matched, tap the red X on the card to delete it immediately. The navigation bar shows a running count like “3 Items Saved”.
Option 2: AI Lookup and Auto-Fill
Take a photo of your item or its packaging and let artificial intelligence identify it and fill in all the details automatically!
- Tap +, then choose AI Lookup
- The first time, you’ll see a brief intro screen explaining the 3-step process: Take a Photo → AI Analysis → Auto-Fill Fields
- Take a clear, well-lit photo of your item or its packaging
- The app will ask if you’d like to capture a second image (such as the back of the packaging) — this can help identify model numbers, barcodes, and other details for a better match
- Wait while the AI analyzes the image — this can take 15 to 60 seconds. You’ll see rotating status messages like “Processing image…”, “Searching web for details…”, “Analyzing packaging details…”, etc.
- Review the auto-filled details and tap Save
Option 3: Database Search / Manual Entry
Search our extensive database to find your item by name, or enter it manually if it’s not found.
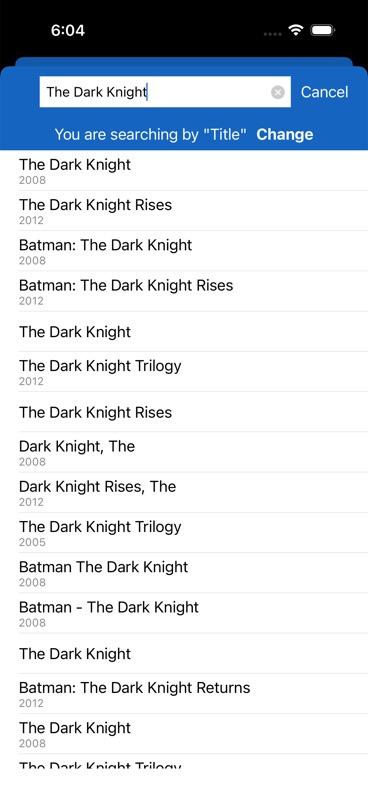
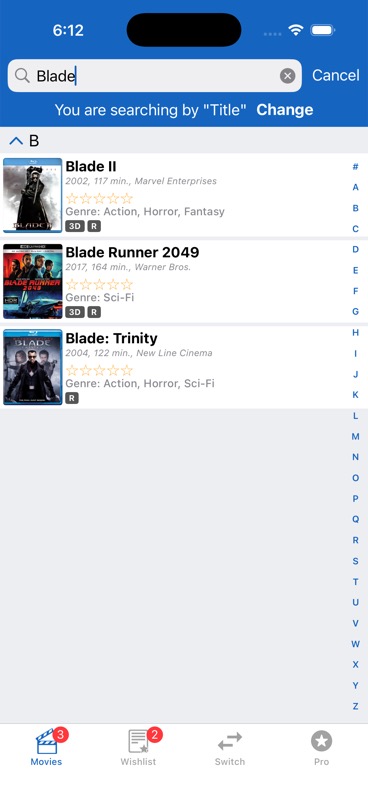
Searching the Database
- Tap +, then choose Database Search / Manual Entry
- Type the name of the item you’re looking for
- Browse the results — items you already own will show a bookmark icon so you won’t accidentally add duplicates
- Tap the correct match to select it
- The item’s details and images will be automatically filled in
- Review and tap Save
You can change which field you’re searching by (Title, Director, Artist, etc.) by tapping Change next to the “You are searching by [Field]” indicator. You can also sort and filter the database results to narrow things down.
Manual Entry
If your item isn’t in our database, tap “Can’t Find My Item” at the bottom of the search results. This will open a blank form with your search text pre-filled as the title, so you can enter the details yourself. You can also go directly to manual entry without searching first.
- A blank form opens with all available fields for your collection type
- Fill in whatever details you’d like (title, year, genre, etc.)
- Add photos from your camera, photo library, clipboard, or web image search
- Tap Save
5. Scanning by Collection Type
Different types of collectibles use different scanning methods. Here’s how scanning works for each category:
Standard Barcode Scanning (Movies, Music, Video Games, and most Collectibles)
These collections use standard UPC/EAN barcode scanning. Simply point your camera at the barcode on the item’s packaging, DVD case, CD jewel case, game case, etc. The barcode is automatically read and looked up in our database. Bulk Scan Mode is available for these types.
ISBN Scanning (Books)
Books use a special scanning method called ISBN OCR — instead of reading a traditional barcode, the app uses your camera to read the printed ISBN text directly from the book. OCR stands for “Optical Character Recognition,” which means the app looks at the text on the page and reads it just like you would with your eyes, converting the printed numbers into a digital lookup. Simply point your camera at the ISBN number on the back cover or inside cover, and the app will recognize and read the digits automatically — no barcode needed.
The app validates that the number is a proper ISBN (13-digit starting with 978 or 979, or a valid 10-digit ISBN). If the scanned text doesn’t look like a valid ISBN, you’ll be prompted to manually enter the full ISBN number for a more accurate result. Bulk Scan Mode is available for books.
Extended Barcode Scanning — +2/+5 Codes (Comic Books and Magazines)
Comic books and magazines use a special type of barcode that includes a supplemental +2 or +5 digit code next to the main barcode. This extra code helps identify the specific issue, printing, and variant on many items.
When scanning comic books or magazines, you’ll see a segmented control at the top of the scanner screen that lets you switch between two modes:
+2/+5 Mode
Reads the supplemental barcode (the small extra barcode to the right of the main barcode). This gives the most specific match for identifying the exact issue.
Standard Barcode Mode
Reads just the main barcode like a normal UPC/EAN scan. Useful when the supplemental code is damaged or missing.
Image Scanning (Trading Cards and Stamps)
Trading cards and stamps don’t use barcode scanning at all. Instead, they are identified by taking a photo of the item. This uses machine learning to visually identify the card or stamp from the image.
- Open the scanner for your trading card or stamp collection
- Position the card or stamp within the visible area of the screen
- Make sure you’re in a well-lit area with no glare on the item
- Tap the “Scan Card” button (or “Scan Stamp” for stamps)
- Wait while the image is processed — the app will auto-enhance the photo, then send it for analysis
- If matches are found, you’ll see suggested results to choose from
For trading cards, if the system detects a grade on a graded/slabbed card (like a PSA grade), it will automatically fill in the grade field for you.
Text/OCR Scanning (Toy Cars)
Toy Cars (like Hot Wheels and Matchbox) have an additional scanning feature that uses text recognition (OCR) to read model numbers directly from the packaging. Put the entire packaging in the camera frame (not just the barcode), and the app will try to detect the model number and other details printed on the box. Please be patient as this can take up to 5 seconds to fully detect all of the information from the back of the packaging.
6. Database Search In-Depth
The database search feature works differently depending on the type of collection you’re adding items to.
Standard Database Search (Movies, Books, Music, etc.)
- Type a search term (title, author, director, etc.)
- Results appear as a scrollable list showing the item’s title, image, and key details
- Items you already own show a bookmark icon and cannot be selected again (preventing accidental duplicates)
- Tap a result to select it and auto-fill the item details
- If your item isn’t in the results, tap “Can’t Find My Item” at the bottom to switch to manual entry — your search text is pre-filled as the title
You can change the search field — for example, instead of searching by Title, switch to Director, Actor, Genre, or any other searchable field. You can also sort and filter the database results to find what you’re looking for more quickly.
Drill-Down Database Search (Select Collection Types)
Some collection types offer a hierarchical drill-down search where you navigate through categories step by step. For example, you might first select a brand or manufacturer, then a product line, then the specific item. This makes it easy to browse organized catalogs with thousands of items.
Trading Card Database Search
Trading cards have their own specialized search screen with additional features:
- Search by title, set, year, or card number
- Sort and filter results — the filter button shows how many active filters you have (e.g., “Filter (3)”)
- Card variants — when multiple variants of a card exist (parallels, refractors, etc.), a banner shows “Not your card? X variants were found” so you can browse alternatives
- Bulk Add Mode — Select multiple cards at once by tapping them (a green checkmark appears on each selected card). Then tap the “Add Selected (N)” button to add all selected cards in one go. You can also use Select All / Deselect All to quickly select everything in the results.
- Section-based grouping — Results are grouped into collapsible sections. In bulk add mode, you can long-press a section header to select or deselect all items in that section.
- Range queries (Comics and Trading Cards) — Search for a range of issues (e.g., issues #1-50) and the results will show the count of items found and group them into sections.
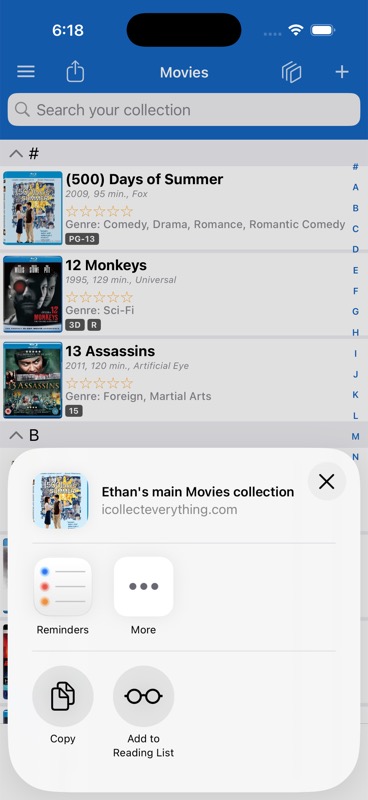
7. Viewing & Browsing Your Collection
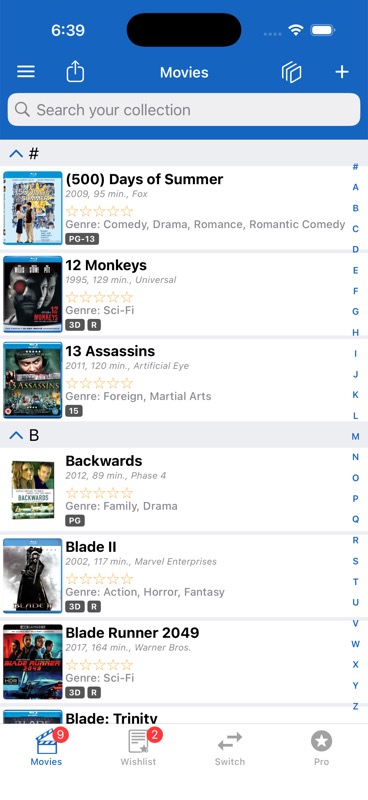
The Collection List
Your main screen shows all items in your current collection. You’ll see:
- Thumbnail images of each item (with optional rounded corners)
- Title and up to 3 subtitle fields (customizable — see Customizing Your Experience)
- Star ratings and other detail labels
- Alphabetical index on the right side — tap any letter to jump to that section. The # symbol is for numbers, and the ˄ arrow jumps to the very top.
- Section headers — items are grouped alphabetically (or by whatever field you’re sorting by). Tap a section header to collapse or expand it. You can optionally show item counts in each section header.
- “Filters Set” indicator — appears when you have active filters, so you know you’re seeing a subset of your collection. Tap it to view or clear your filters.
Item Detail View
Tap any item to see its full details. The detail view shows:
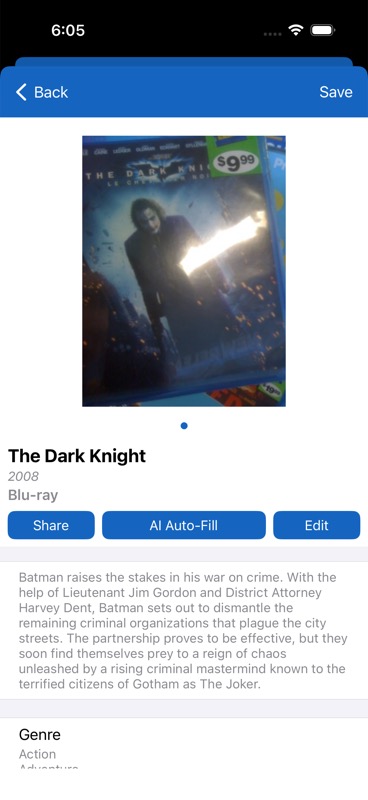
- Image gallery at the top — swipe left and right to see all photos (4 for standard users, up to 10 for Pro subscribers). Page dots below show which image you’re viewing. Tap any image to view it full-screen with pinch-to-zoom, and swipe between all images in the full-screen viewer.
- Status badges below the image:
- Quantity badge — shows when you have more than 1 of the item
- “3D” badge — for 3D movies/Blu-rays
- “Loaned” badge — when you’ve lent the item to someone
- “Pre-ordered” badge — for wishlist items you’ve pre-ordered
- Title, year, format, and content rating
- Three action buttons:
- Share — share this item with others via any iOS sharing method
- AI Auto-Fill — run AI to fill in or update missing details (see AI Features)
- Edit — open the full editing form
- Description — a synopsis or description of the item. Long descriptions are truncated with a “>” indicator — tap to expand and read the full text.
- All metadata fields — organized into three sections: Main (core data), Item (type-specific details like actors, tracks, etc.), and Personal (your notes, rating, purchase info, etc.)
- Estimated Value — shows your manual value, or an automatically looked-up value with a “~” prefix (e.g., “~$15.99”) indicating it’s an estimate
- Barcode number and Date Added (automatically set when you add the item and cannot be changed)
At the very bottom of the detail view, you’ll find additional action buttons:
- Show/Hide Fields — choose which fields are visible on this screen
- Move to Wishlist (or Move to Owned for wishlist items) — transfer the item between your collection and wishlist
- Duplicate Item — create a copy of this item as a new entry (useful for variants or owning multiple copies). The copy opens in the editing form with all details pre-filled but a new ID, so you can make changes before saving.
- Delete — permanently remove the item (you’ll be asked to confirm)
Full-Screen Image Viewer
Tap any image in the detail view to open it full-screen. You can:
- Pinch to zoom in and out for a closer look
- Swipe left/right to navigate between all the item’s images
- Tap Done to return to the item detail view
How To: Report an Inappropriate Image
If you see a database image that contains inappropriate, offensive, or incorrect content, you can report it directly from the app:
- Open the item with the problematic image
- Tap the image to open the full-screen image viewer
- Tap the Report button
- Confirm that you want to report the image
- The image is flagged for our team — it will be reviewed and removed from our servers within 24 hours
After submitting a report, the Report button becomes disabled for that image to prevent duplicate submissions. This feature helps keep our shared database clean and appropriate for all users. The Report button is only available for images that come from our database — it won’t appear for personal photos you’ve taken yourself.
8. Editing Items
From the item detail view, tap Edit to open the editing form. You can modify any field for the item.
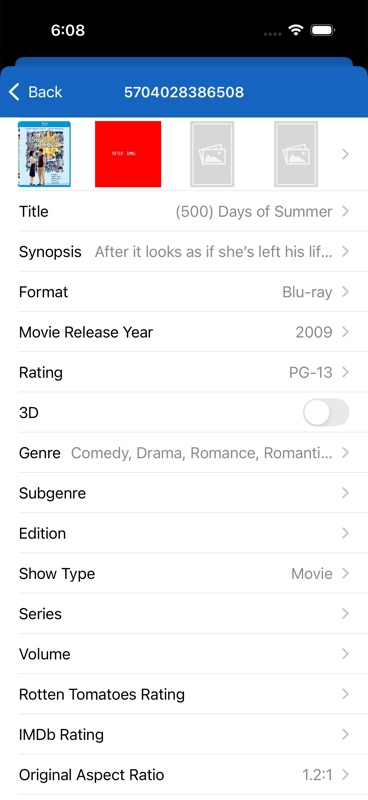
Types of Fields You’ll Encounter
- Text fields — Type in a value (title, notes, etc.). Some have maximum character limits.
- Long text / Multiline — For longer entries like descriptions and detailed notes
- Dropdown selectors (Single Select) — Pick one option from a list (genre, format, condition, etc.). Some allow you to add your own custom values using a “+” or “Add” button.
- Multi-select — Pick multiple options (e.g., multiple genres, multiple features)
- Star rating — Tap 1-5 stars directly in the cell to rate the item
- Toggle switches — Turn options on or off (e.g., “Opened”, “First Edition”)
- Date pickers — Select a date. Depending on the field, this might be a full date (day/month/year), month and year only, or year only.
- Currency fields — Enter a dollar amount along with a currency selector (USD, EUR, GBP, etc.)
- Name fields — For people like actors, directors, or authors. These include first name, middle name, last name, and role/job fields with search and auto-complete.
- Text lists — Enter comma-separated values. A dropdown of previously used values appears for quick re-entry.
- Drill-down selectors — Navigate through 2-3 levels of nested categories to find the right value
- Quantity stepper — Use + and – buttons to adjust how many copies you own (defaults to 1)
- Country picker — Choose from a full list of countries
- Segment fields — A text field paired with a unit selector (e.g., dimensions with cm/inches)
Conditional Fields
Some fields only appear when another field has a specific value. For example, in a Movie collection, the “Season” field only shows up when the Format or Type is set to “TV Series.” This keeps the editing form clean and relevant to your specific item.
Editing Images
Tap the image row at the top of the edit form to manage your item’s photos. See Managing Images for full details.
Custom Collection Fields
If you’re editing an item in a custom collection, you’ll see an “Edit Your Custom Fields” button at the bottom of the edit form. Tap it to add, remove, rename, or reorder your custom fields.
9. Deleting Items
How To: Delete a Single Item
There are two ways to delete an individual item:
From the Detail View
Open the item, scroll to the very bottom, and tap Delete. Confirm when asked “Are you sure?” The item is permanently removed from the server, and all cached images are deleted from your device.
From the List View
In your collection list, swipe left on the item to reveal the delete button, then tap it.
10. Bulk Actions (Edit, Delete, Move)
Need to edit, delete, or move multiple items at once? The app has a powerful bulk action system accessed via the Bulk icon in your toolbar.
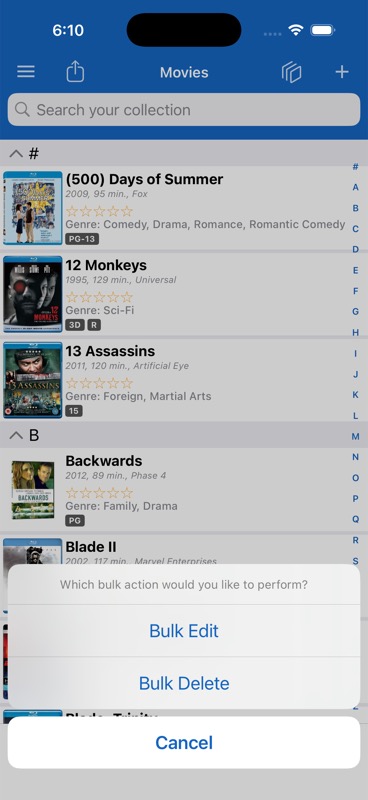
How To: Bulk Edit Multiple Items
- In your collection or wishlist, tap the Bulk icon (stacked squares icon) in the top toolbar
- An action sheet appears asking “Which bulk action would you like to perform?”
- Tap “Bulk Edit”
- The screen enters selection mode — the title changes to “Select items to edit”
- Tap each item you want to edit — a green checkmark appears on selected items
- A floating button at the top shows “Edit Selected (N)” updating as you select
- You can also long-press a section header to select or deselect an entire section at once
- Tap the “Edit Selected” button when ready
- A bulk editing form opens showing “Edit Fields (X items)” — change any field values and they’ll be applied to all selected items when you save
- Each field also shows a red trash icon — tap it to clear that field’s data across all selected items
How To: Bulk Delete Multiple Items
- Tap the Bulk icon (stacked squares icon) in the top toolbar
- Tap “Bulk Delete” from the action sheet
- The screen enters delete selection mode — the title changes to “Select items to delete”
- Tap each item you want to remove — a red checkmark appears on selected items
- A floating button at the top shows “Delete Selected (N)” updating as you select
- You can long-press a section header to select or deselect an entire section
- Tap “Delete Selected” when ready
- Confirm the deletion when asked “Are you sure you want to delete N items?”
- Items are deleted one by one — you’ll see progress as each item is removed from the server
11. Using the Wishlist
The Wishlist tab is your personal shopping list for items you want to find, buy, or acquire. It works exactly like your main collection — same layouts, search, sort, filter, and adding methods — but keeps everything separate.
Key Wishlist Features
- Pre-ordered Status — Mark items you’ve already pre-ordered so you know what’s on the way. This shows as a “Pre-ordered” badge on the item.
- Move to Owned — When you finally get that item, transfer it from the wishlist to your main collection with one tap from the item’s detail view. The quantity is set to 1 when moved.
- Share Wishlist — Generate a link to share your wishlist with friends and family (great for birthdays and holidays!)
- Completely Separate Settings — Your wishlist has its own sort order, filters, cell display configuration, and auto-input settings, all independent from your main collection. This means you can organize your wishlist completely differently from your owned items.
How To: Move Items Between Collection and Wishlist
Moving a single item:
- Open the item’s detail view
- Scroll to the bottom
- Tap Move to Wishlist (if in collection) or Move to Owned (if in wishlist)
- Confirm the move in the alert that appears
- The item instantly transfers to the other list
12. Switching Between Collections
iCollect Everything supports 40+ collection types, and you can switch between them at any time.
How to Switch
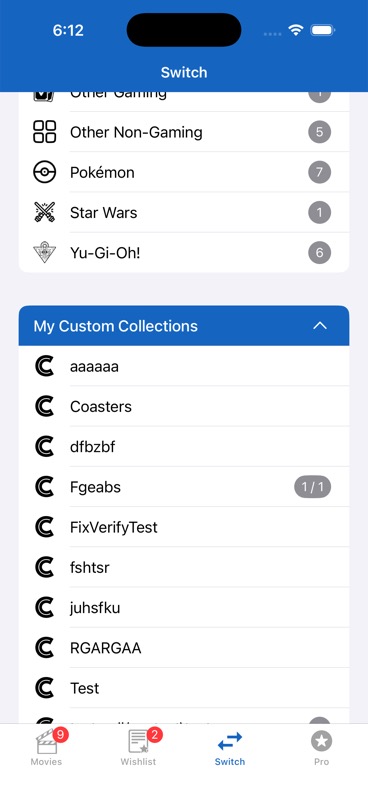
- Tap the Switch tab at the bottom of the screen
- You’ll see all collection types organized into expandable/collapsible categories: Media, Collectibles, Trading Cards (Sports), Trading Cards (Other), and My Custom Collections
- Tap any category header to expand or collapse it
- Tap any collection type to switch to it
- A checkmark indicates which collection is currently active
Each collection type maintains its own completely separate items, settings, sort order, filters, layout, and cell display — so switching collections is like opening a completely different inventory.
Available Collection Types
Media: Books, Comic Books, Movies, Music, Video Games
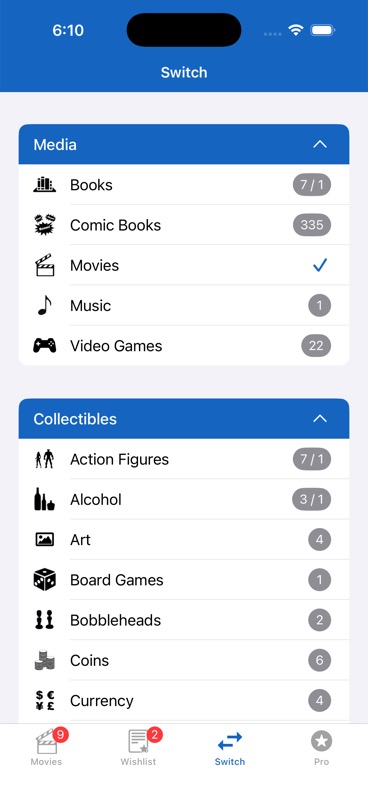
Collectibles:
- Action Figures
- Alcohol
- Art
- Board Games
- Bobbleheads
- Coins
- Currency
- Dolls
- LEGO
- Magazines
- Model Planes
- Model Trains
- Ornaments
- Pez
- Pins
- Playmobil
- Plush
- Puzzles
- Sci-Fi
- Shoes
- Snow Globes
- Stamps
- Toy Cars
- Vinyl Figures
- Watches
- Wine
Trading Cards — Sports: Baseball, Basketball, Boxing, Cricket, Football, Golf, Hockey, Lacrosse, MMA/UFC, Motorsport, Multi-Sport, Rugby League, Rugby Union, Soccer, Tennis, Wrestling
Trading Cards — Other: Disney, Entertainment, Gaming, Garbage Pail Kids, Marvel, Non-Sport, Pokemon, Star Wars, Yu-Gi-Oh!
Renaming a Collection Type
Want to call a collection something different? You can rename any collection type on the Switch tab:
- Go to the Switch tab
- Long-press (touch and hold) on the collection name you want to rename
- Type your new name in the dialog that appears
- Tap Save
Hiding Collection Types
Don’t collect stamps or wine? You can hide collection types you don’t use from the Switch tab. Go to ☰ Menu > Settings > Switch Tab and toggle off any collection types you don’t need. They’ll still be there if you ever want them — just toggle them back on.
13. Creating Custom Collections
If none of the 40+ built-in collection types fit what you collect, create your own!
How to Create a Custom Collection
- Go to the Switch tab
- Scroll to the bottom and tap Create Custom Collection
- Enter a unique name for your collection (cannot be empty, cannot duplicate an existing name, cannot contain ~)
- Define your fields — choose from these types:
- Text (single line)
- Long Text (multi-line)
- Date Picker (full date, month/year, or year only)
- Currency Picker
- Text List (with history dropdown)
- Star Rating
- Toggle (on/off switch)
- Quantity
- Estimated Value
- You can add up to 31 fields per custom collection (only one Quantity and one Estimated Value field allowed)
- Tap Save, and your new collection is ready to use!
Editing Your Custom Fields Later
You can modify your custom collection’s fields at any time. Open any item in your custom collection, tap Edit, then scroll to the bottom and tap Edit Your Custom Fields. From here you can add, remove, rename, and reorder fields. Changes apply to all existing items in that collection.
14. Searching Your Collection
The search bar is located at the top of your collection and wishlist views.
- Tap the search bar at the top of the screen
- Start typing — results filter in real-time as you type
- By default, search looks at the Title field
- To search by a different field (like Genre, Director, Year, Actor, etc.), tap Change next to “You are searching by [Field]”
- The alphabetical index on the right side updates to reflect filtered results
- Tap Cancel to clear the search and return to your full list
15. Sorting Your Collection
Access sorting from ☰ Menu > Sort.
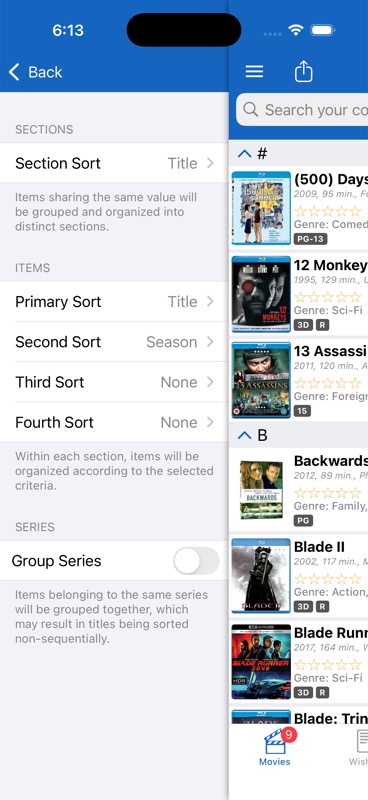
iCollect Everything offers a powerful multi-level sorting system with up to 5 levels:
- Section Sort — Determines how items are grouped into sections. For example, sort sections by Genre and your items will be grouped under “Action”, “Comedy”, “Drama”, etc. instead of A-Z. Has its own ascending/descending direction.
- Primary Sort — The main sort order within each section (e.g., Title A-Z)
- Secondary Sort — A tie-breaker when primary values match. Can be cleared.
- Third Sort — Additional refinement level. Can be cleared.
- Fourth Sort — Final tie-breaker. Can be cleared.
Each level can be set independently to Ascending (A→Z, 0→9, oldest→newest) or Descending (Z→A, 9→0, newest→oldest).
You can sort by many different fields including Title, Date Added, Year, Genre, Rating, Quantity, Estimated Value, Purchase Price, Format, Studio, Country, and more — any field marked as sortable for your collection type.
Group Series
Available for certain collection types like Movies, Video Games, and Books. When enabled, items that share the same Series field will be grouped together, which may cause titles to appear in a non-alphabetical order but keeps related items (like sequels and series entries) next to each other.
16. Filtering Your Collection
Access filtering from ☰ Menu > Filter.
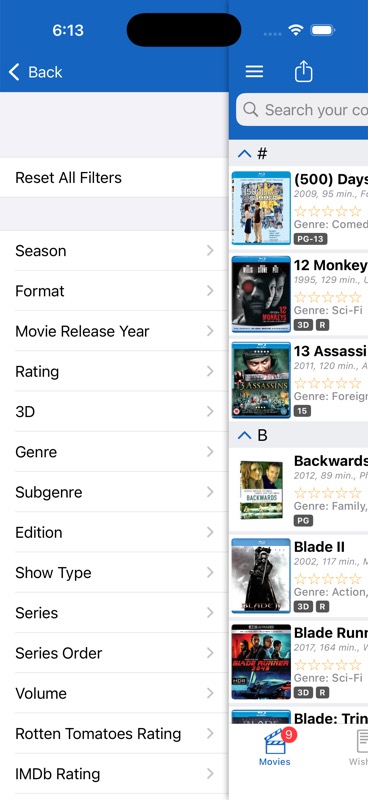
Filters let you temporarily show only items that match certain criteria — like showing only Blu-ray movies, only 5-star items, or only comic books from a specific year.
- Open ☰ Menu > Filter
- You’ll see all filterable fields for your current collection type
- Tap a field (e.g., Genre, Format, Year)
- Select one or more values to filter by (e.g., select both “Sci-Fi” and “Thriller”)
- Filters across different fields combine with AND logic (so filtering by Genre: Sci-Fi AND Format: Blu-ray shows only Sci-Fi Blu-rays)
- When filters are active, a “Filters Set” indicator appears on your collection view — tap it to view or clear
Managing Filters
- Reset All Filters — Clears all active filters and returns to your full, unfiltered view
- Save Current Filter (Pro) — Save your current filter setup with a custom name so you can quickly apply it again later. Active saved filter shows a checkmark.
- Saved Filters — Access your saved presets. Long-press to rename a saved filter. Swipe left to delete one.
How To: Save a Filter Preset (Pro)
- Set up the filters you want (e.g., Genre: Sci-Fi, Format: Blu-ray)
- Tap Save Current Filter
- Give it a name (e.g., “My Sci-Fi Blu-rays”)
- Next time, just open Filters and tap your saved preset to instantly apply it
Filters remain active until you explicitly clear them. Each collection type and wishlist maintains its own filter settings independently.
17. Layout & Display Options
Access layouts from ☰ Menu > Layout.
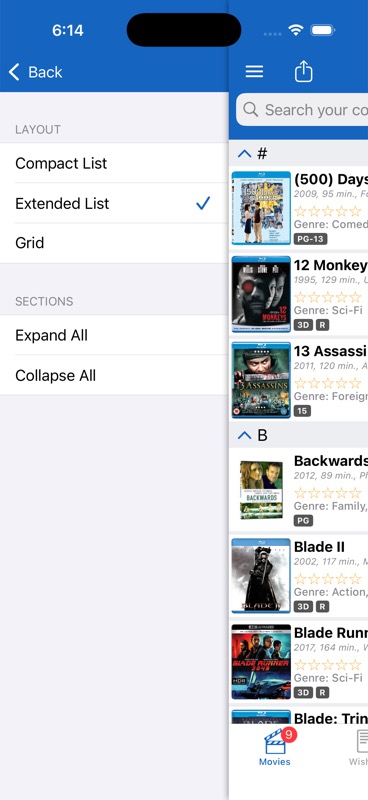
Choose how your collection is displayed with three layout options:
Compact List
Small thumbnails with title and one subtitle. Shows the most items per screen — great for quickly scrolling through large collections.
Extended List (Default)
Larger thumbnails with title, up to 3 subtitle fields, star rating, and 2 label fields. More detail visible at a glance.
Grid View
Items displayed as a visual grid of cover art and images. Great for collections with good cover art like movies, comics, or trading cards. You can toggle titles on/off below each image, and adjust how many items appear per row using a slider (default: 3 on iPhone, 5 on iPad).
Section Controls
Expand All opens all collapsed sections at once. Collapse All minimizes everything to just section headers for a quick overview of categories.
18. Managing Images
Each item can have up to 10 images. You can add images from multiple sources:
Adding Images
- Open an item and tap Edit
- Tap the image row at the top of the edit form
- You’ll see 10 image slots — tap an empty slot to add an image
- Choose your source:
- Camera — Take a photo right now. For stamps, this uses automatic rectangle detection to find and crop the stamp from the photo.
- Photo Library — Select from your existing photos
- Paste from Clipboard — Paste an image you’ve copied from another app
- Web Image Search — Search Google Images by keyword to find a picture of your item. Results appear as a grid of thumbnails — tap one to select it. The search is pre-filled with your item’s title for convenience.
Editing Images
After adding an image, you can tap on it to access these editing tools:
- Manual Crop — Crop the image yourself by dragging the corners and edges
- AI Clean Up and Crop — Let AI remove shadows, reflections, and messy backgrounds to make your image look like a professional product photo (uses 3 scan credits, or 5 in Deep Mode). See AI Features for more details.
- Report Image — Flag an inappropriate or incorrect database image for our team to review. Reported images are removed from our servers within 24 hours. The button disables after you’ve submitted a report. See Reporting Inappropriate Images above for more details.
Image Settings
- Save Images Locally (Settings) — When enabled, images are cached on your device for offline viewing and faster loading. Uses more device storage. When disabled, images are loaded from the internet each time.
- Round Image Corners (Settings) — Applies rounded corners to thumbnails in your collection list for a softer look.
- Rectangle Cropping (Settings) — When taking photos, automatically detects and crops rectangular items like stamps, cards, and similar flat collectibles.
19. AI Features
iCollect Everything includes powerful AI features to help you catalog your items faster and with more detail.
How To: Use AI Lookup (When Adding New Items)
- Tap the + button in your collection
- Select AI Lookup
- Take a photo of your item — get the front cover, packaging, or label clearly in frame
- Optionally take a second photo (like the back of the item) for better results
- The AI analyzes your photos, searches the web, and identifies the item
- Review the auto-filled details and save
The first time you use this feature, you’ll see an intro explaining the three steps: Take a Photo, AI Analysis, and Auto-Fill Fields. Each scan takes anywhere from 15 to 60 seconds.
How To: Use AI Auto-Fill (For Existing Items)
Already added an item but want more details filled in? Use AI Auto-Fill from the item’s detail view:
- Open any item’s detail view
- Tap the AI Auto-Fill button
- Choose your mode:
- Auto-Fill All Fields — AI updates every field it can find information for
- Auto-Fill Empty Fields — AI only fills in fields that are currently blank (doesn’t overwrite your existing data)
- Select Fields — Choose specific fields you want the AI to update
- The AI analyzes your item’s images and existing data, searches the web, and fills in details
- You’ll see a summary of changes:
- “Fields Added (N)” — lists newly populated fields
- “Fields Updated (N)” — lists fields with changed values
- A verification warning reminds you to review the changes carefully before saving — AI isn’t always 100% accurate
The AI is specially tuned for different collection types. For example:
- Comic Books — Checks for virgin variants and identifies the artist/artwork
- Stamps — Looks up Scott, Stanley Gibbons, and Michel catalog numbers from databases like StampWorld and Colnect. Translates non-English text.
- Toy Cars (Hot Wheels) — Finds model numbers, barcodes, and specific car details
- Pins — Searches PinPics, eBay, and other sources. For Disney pins, identifies characters and creates detailed search descriptions.
- Trading Cards — Identifies parallel cards (e.g., #/25 means a parallel — the AI looks up what type), detects foil/holo effects, and cross-references with set databases
AI Deep Mode
For the most thorough analysis possible, enable AI Deep Mode in ☰ Menu > Settings > AI Deep Mode.
- Performs extensive web searches across 5-7+ different sources and databases
- Cross-references multiple platforms for maximum accuracy
- Looks for obscure details, catalog numbers, and historical information
- Uses 2x scan credits per scan
- Takes longer (a few minutes) but delivers much more detailed results
- When active, a banner at the top of the camera screen shows “AI Deep Mode Active — Enhanced analysis • Uses 2x scans”
AI Image Cleanup
Make your collection photos look professional! AI Image Cleanup:
- Removes shadows, reflections, and flash glare
- Straightens, orients, and deskews the image
- Replaces the background with a clean white or black background
- Crops to minimize whitespace
- Makes it look like a professional stock/product photo
Costs 3 scan credits (or 5 in Deep Mode). Access it when editing an image by tapping the bandaid/cleanup icon in the toolbar.
Collection-specific cleanup behaviors:
- Stamps — Removes the stamp from any paper or envelope. You’ll be asked whether to keep or remove any postmark cancellation.
- Coins — Preserves patina, wear, and toning
- Pins — If the pin is on a backer card, you’ll be asked whether to keep or remove the card backer
- Trading Cards — Keeps card edges sharp, preserves holographic/foil effects. If in a graded slab, you’ll be asked whether to keep or remove the slab.
- Comics — If in a graded slab, you’ll be asked whether to keep or remove the slab.
AI Scan Credits — Why AI Scanning Has a Separate Cost
AI scanning is an entirely optional feature — you never need to use it. You can always add items via barcode scanning, database search, image scanning (for trading cards and stamps), or manual entry at no extra cost.
So why does AI scanning cost extra? Each time you use AI Auto-Fill or AI Image Cleanup, the app sends your photos to advanced AI services (like the ones that power ChatGPT and Google Gemini) for analysis. We are charged by our AI providers for every single scan — the AI analyzes your images, searches the web, and identifies your item’s details, which uses computing resources on their end. The credit system lets us pass this cost through as affordably as possible, rather than building it into a higher subscription price that everyone would pay whether they use AI or not.
Think of it like this: barcode scanning and database search are lookups against our own database (free), while AI scanning calls out to external AI services that charge us per use.
Free Scans to Try It Out
- Free users start with 15 free AI scans — enough to try the feature and see how it works
- Pro users start with 100 free AI scans — a generous amount to explore all AI features
Purchasing Additional Scans
When you run out, you can purchase additional credit packs. The more you buy, the cheaper each scan gets:
- 50 Scans — Good starter pack
- 250 Scans — Save 10% per scan
- 500 Scans — Best value, save 20% per scan
Important Details
- Credits are one-time purchases (not subscriptions) and never expire
- If the AI can’t identify your item or returns empty results, your credits are automatically refunded — you only pay for successful scans
- Standard AI scan uses 1 credit
- AI Deep Mode uses 2 credits per scan (for the more intensive analysis)
- AI Image Cleanup uses 3 credits (or 5 credits in Deep Mode)
- AI scan + Image Cleanup together uses 4 credits (or 7 in Deep Mode)
- Each pack shows the per-scan price breakdown so you can see exactly what you’re paying
- Credits are stored on our servers and synced to your account, so they’re available on any device you sign into
20. Customizing Your Experience
iCollect Everything is highly customizable. Access all customization options from ☰ Menu > Settings.

Customize Cell Data
Choose which information shows on each item card in your collection list. You can customize up to 5 label positions: 3 subtitle fields (sub1, sub2, sub3) and 2 additional labels (label1, label2). Map each one to any field you want. For example, show Genre, Year, and Format at a glance without opening each item.
Your collection and wishlist have separate cell data settings, so you can display different information in each. The wishlist also offers “Pre-ordered” as a cell data option.
Customize Data Fields (Show/Hide Fields)
Show or hide fields on the item detail view. If you never use the “Loaned To” field or the “Country” field, just hide them to keep things clean. Toggle the checkmark next to each field. There’s also a Hide Empty Fields toggle that automatically hides any field with no data — this is on by default and keeps your detail view much cleaner.
You can also access this from any item’s detail view by scrolling to the bottom and tapping Show/Hide Fields.
Title Format
Control how article words are handled for better alphabetical sorting:
- Turn on “The” formatting — “The Matrix” becomes “Matrix, The” for sorting
- Turn on “A/An” formatting — “A Quiet Place” becomes “Quiet Place, A”
This makes it much easier to find items alphabetically. Note: These options are not available for languages that don’t use articles (like Japanese, Chinese, Korean, Russian, Polish, etc.).
Default Field Data
Set default values that automatically fill in when you create new items. This is perfect for fields you commonly set to the same value, like Country of Purchase, Currency, or Format.
How To: Set Default Field Data
- Go to ☰ Menu > Settings > Default Field Data
- You’ll see all available fields for your current collection type
- Tap any field and enter the value you want as the default (e.g., set Currency to “USD” or Format to “Blu-ray”)
- Now every time you add a new item, those fields will be pre-filled automatically
Instead of entering “USD” or “Blu-ray” every single time, set it once as a default and it’s pre-filled for every new item. Supports all field types including text, numbers, dates, currencies, toggles, ratings, and dropdowns.
21. Themes & Appearance
Access from ☰ Menu > Settings > Themes.

Display Mode (Pro Feature)
- Light Mode — Always light, regardless of your iPhone’s system setting
- Dark Mode — Always dark, regardless of your iPhone’s system setting
- System Mode — Follows your iPhone’s Light/Dark mode setting (default)
Free users are set to System Mode, which automatically matches your iPhone’s Light/Dark setting. Pro users can force either mode regardless of the system setting.
Theme Colors
The default theme is Blue, which is available to all users. Pro subscribers get access to 26 additional color themes, each with both light and dark variants:
Red, Orange, Yellow, Green, Purple, Pink, Maroon, Salmon, Lavender, Navy, Sky, Teal, Mint, Army, Brown, Tortilla, Gray, Pearl, and Charcoal.
Your theme changes the navigation bar, tab bar, buttons, accent colors, and even the app icon on your home screen to match your chosen color!
How To: Change Your Theme
- Open ☰ Menu > Settings
- Tap Themes
- Browse the available colors — your current theme has a checkmark
- Tap any color to apply it instantly
- The navigation bar, buttons, and app icon will all update to match
22. Collection Value & Estimated Values
Access from ☰ Menu > Collection Value.
See what your entire collection is worth at a glance!
How Estimated Values Work
Each item in your collection can have an Estimated Value. There are two ways values get set:
- Automatic estimated value — The app automatically looks up current market values by scraping sold listings and pricing data from online sources like eBay and other marketplace databases. These values show with a “~” (tilde) prefix (e.g., “~$15.99”) — the “~” means “approximately” and tells you this is an estimate from our system, not a number you entered. The app calculates the median price from multiple sold listings to give you the most accurate estimate.
- Manual value (your own) — You can override the automatic estimate with your own value. When you manually enter a value, the “~” disappears and the price is shown as a firm number (e.g., “$20.00”) — because it’s your assessment, not an estimate.
How To: Set Your Own Estimated Value
- Open the item and tap Edit
- Scroll down to the Estimated Value field
- Type in your own value — this immediately overrides any automatic estimate
- Save the item
Your manual value will now be shown without the “~” prefix, and automatic refreshes will be skipped for this item. If you later want to go back to automatic estimates, open the Estimated Value field and tap “Clear and Use Automatic” — the app will look up the current market value again and show it with the “~” prefix.
When Do Values Update?
Automatic estimated values refresh on a schedule:
- Free users: Values refresh when they are more than 30 days old
- Pro users: Values refresh when they are more than 1 day old — giving you near real-time value tracking
Values are checked and updated automatically whenever you view an item’s detail page. If the stored value date is older than the threshold above, the app runs a fresh lookup in the background and updates the value without interrupting your browsing.
If you set a manual estimated value, the automatic refresh is skipped for that item — your manual assessment always takes priority. You can clear your manual value and switch back to automatic by tapping “Clear and Use Automatic” in the Estimated Value editor.
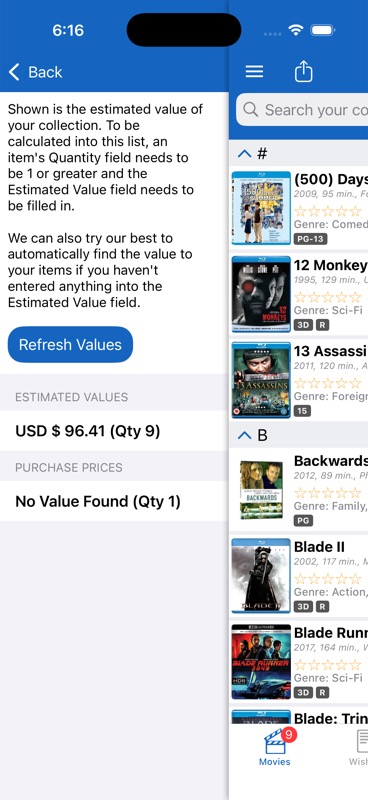
The Collection Value Screen
This screen shows three sections:
Section 1: Estimated Values
- Shows total value per currency with item counts
- Format: “USD $1,234.56 (Qty 45)”
- Supports multiple currencies simultaneously — if you collect items valued in different currencies, each is shown separately
- Items with a quantity greater than 1 have their value multiplied by the quantity (e.g., 3 copies of a $10 item = $30)
Section 2: Purchase Prices (Pro Only)
- Shows the total of what you actually paid for your items
- Free users see “Hidden” with a prompt to upgrade to Pro
Section 3: Value Minus Price (Pro Only)
- Shows your profit or loss (Estimated Value minus Purchase Price)
- Icons indicate the direction:
- ▲ Up arrow — Your collection has increased in value (profit)
- ▼ Down arrow — Your collection has decreased in value (loss)
- ≡ Equals — No change
- Free users see “Hidden” with a prompt to upgrade
Refresh Values Button
Tap Refresh Values on the Collection Value screen to automatically look up estimated values for items that don’t have one yet. The app will search online pricing sources for current market prices, processing items one at a time with a brief delay between each to avoid overloading the servers. A progress indicator shows which item is being looked up.
23. Cloud Sync & Your Account
Free Cloud Backup
Every user gets free cloud backup — no Pro subscription required! Creating an account lets you:
- Back up your entire collection safely to the cloud
- Sync between your iPhone, iPad, and other devices
- Access your collection on the web at icollecteverything.com
- Recover your collection if you get a new device or reinstall the app
- Protect your purchase history
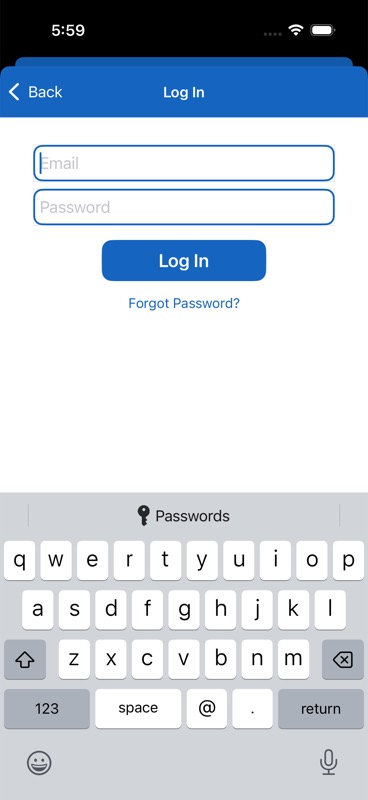
Creating an Account
- Tap ☰ Menu > Log In
- Tap Create New Account
- Enter your email and choose a password
- That’s it! Your collection will start syncing automatically
Logging In on Another Device
When you log into an existing account on a new device, you’ll be asked whether to:
- Use Account — Download your cloud data to this device (recommended for new/replacement devices)
- Use Device — Push this device’s local data to the cloud (use this if you started fresh and want to keep what’s on this device)
Forgot Password
Tap Forgot Password on the login screen, enter your email address, and you’ll receive instructions to reset your password.
Account Management
Once logged in, go to ☰ Menu > Account to:
- Redeem a Promo Code — Enter a numeric code to unlock a collection type for free
- Change Password — Enter your current password and choose a new one
- Change Email — Update your account email address
- Delete Collection — Permanently erase all items in your current collection. You must type “DELETE” to confirm. This also clears the image cache and resets your sorting.
- Delete Wishlist — Permanently erase all wishlist items (same confirmation process)
- Delete Account — Remove your account entirely (requires your password to confirm)
- Log Out — Sign out of cloud sync
- Manage Subscriptions (Pro users) — Opens your Apple subscription management in iPhone Settings
24. Import & Export
Importing Data
Want to bring in a collection from a spreadsheet or another app?
- Go to ☰ Menu > Import
- Make sure you’re logged into your account first
- Email your CSV file to support@icollecteverything.com
- Our team will process the import for you
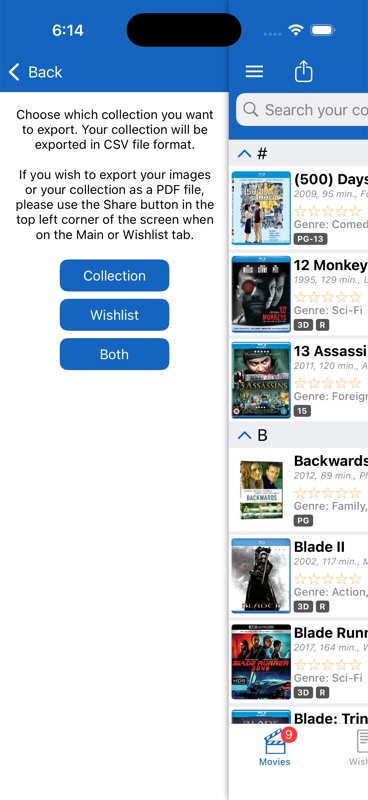
How To: Export Your Collection
Export your collection as a CSV spreadsheet that you can open in Excel, Google Sheets, Numbers, or any other spreadsheet program.
- Go to ☰ Menu > Export
- Choose what to export: Collection Only, Wishlist Only, or All (both combined)
- Select which fields to include using the checkboxes (or use Select All / Deselect All). Barcode, Item ID, and Date Added are always included automatically.
- Tap Export — the CSV file is generated
- Save it, email it, AirDrop it, or share via any method using the iOS share sheet
The export handles complex data types automatically — person names are combined into full names, toggle fields become “Yes”/”No”, and currency values are properly formatted.
25. Sharing Your Collection
How To: Share Your Entire Collection
- Open ☰ Menu > Share Collection
- The app generates a public web link to your collection on icollecteverything.com
- Share it via text, email, social media, AirDrop, or any other method using the iOS share sheet
- Anyone with the link can browse your collection online — no account needed
Works the same way for your wishlist via ☰ Menu > Share Wishlist — great for sending gift ideas to friends and family for birthdays or holidays! You can also log in on our website to view and access your collection online anytime.
How To: Share a Single Item
- Open any item’s detail view
- Tap the Share button
- A link to that specific item is created — the share preview shows the item’s image and title
- Send it to anyone via Messages, Mail, AirDrop, or any other sharing option
Share This App
Go to ☰ Menu > Share This App to share the app download link with friends. Sharing with 3 or more friends earns you the “Share With Friends” achievement!
26. Tracking Loaned Items
Lend a movie to a friend? Let someone borrow a book? The app can help you remember who has it!
How To: Mark an Item as Loaned
- Open the item you’ve loaned out and tap Edit
- Find the Loaned To field
- Type the person’s name, or tap the contacts icon to browse your iPhone contacts and select someone
- Save the item — a “Loaned” badge will now appear on the item in its detail view
The app remembers names you’ve used before, building a quick-select list so you don’t have to type them again. You can swipe to delete names from this saved list if needed.
When the item is returned, edit the item again and tap the “Returned” button in the Loaned To field to clear the loaned status immediately.
27. Achievements
iCollect Everything includes achievements to unlock as you use the app! Check your progress anytime from ☰ Menu > Achievements. Earned achievements appear in full color with custom badge designs. Unearned achievements are shown in grayscale with a lock icon. When you unlock a new achievement, a toast notification slides in from the top of the screen.
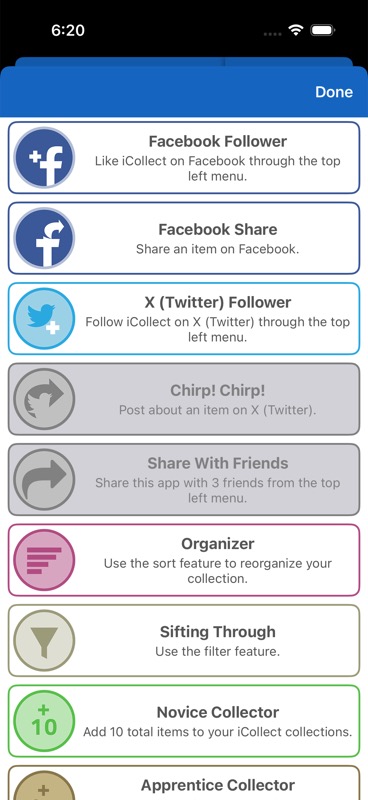
Collection Achievements
- Novice Collector — Add 10 items total (shows progress bar)
- Apprentice Collector — Add 25 items total
- Journeyman Collector — Add 100 items total
- Expert Collector — Add 250 items total
- Artisan Collector — Add 500 items total
- Master Collector — Add 750 items total
- Grand Master Collector — Add 1,000 items total
- Make a Wish — Add 5 items to your wishlist
Social Achievements
- Facebook Follower — Like iCollect on Facebook (☰ Menu > Like on Facebook)
- Facebook Share — Share an item to Facebook
- X (Twitter) Follower — Follow iCollect on X/Twitter (☰ Menu > Follow on X)
- Chirp! Chirp! — Post about an item on X/Twitter
- Share With Friends — Share the app with 3+ friends
- Social Butterfly — Complete all 4 social achievements above
Exploration Achievements
- Informed — Read the FAQ (☰ Menu > FAQ)
- Organizer — Use the secondary sort feature
- Sifting Through — Use the filter feature
- Shake! — Enable shake-to-select in Settings
- Explorer — Visit each of the 6 Settings sub-screens (Customize Cell Data, Customize Data Fields, Title Format, Switch Tab, Default Field Data, and Themes)
Mystery Achievements
There are also 2 mystery achievements shown as “Mystery Achievement” with a lock until you discover and earn them. We won’t spoil them here — see if you can figure out what they are!
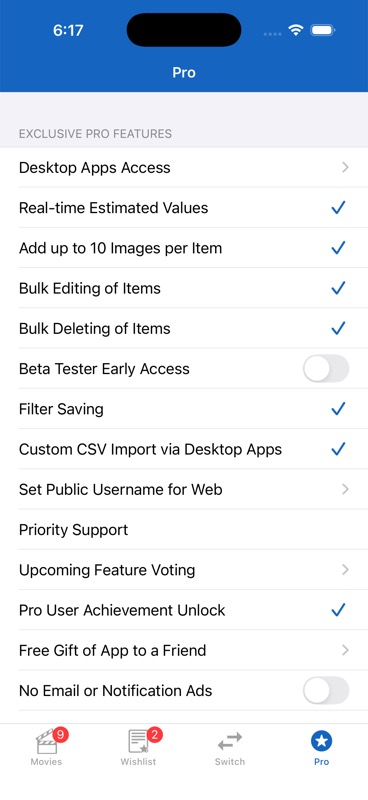
28. Pro Subscription — Complete Guide
The Pro subscription is an annual subscription that unlocks a powerful suite of features for serious collectors. You can access it from the Pro tab (star icon at the bottom, visible to free users) or from ☰ Menu > In-App Purchases.
For a detailed breakdown of all our product offerings and pricing, visit our pricing and product breakdown page.
All 21 Pro Features Explained
1. Desktop Apps Access
Free access to download and use the Mac and Windows desktop apps. Search for “iCollect Everything” in the Mac App Store or Microsoft Store. Log in with your same account to sync.
2. Real-Time Estimated Values
Automatic estimated values refresh every 1 day instead of every 30 days for free users. This gives you near real-time tracking of your collection’s market value. View your totals at ☰ Menu > Collection Value.
3. Up to 10 Images Per Item
Upload up to 10 photos per item for complete visual documentation of your collectibles from every angle. Add images by opening any item, tapping Edit, then tapping the image area to add from camera, photo library, or web.
4. Bulk Editing of Items
Tap the Bulk icon (stacked squares) in the toolbar, choose “Bulk Edit”, select your items, then tap “Edit Selected”. Change field values across all selected items at once. See Bulk Actions for the full walkthrough.
5. Bulk Deleting of Items
Tap the Bulk icon in the toolbar, choose “Bulk Delete”, select the items you want to remove, then tap “Delete Selected”. See Bulk Actions for the full walkthrough.
6. Beta Tester Early Access
Toggle on from the Pro tab to get early access to new features before they’re released to everyone. Help test and shape the future of the app.
7. Filter Saving
Go to ☰ Menu > Filter, set up your desired filters, then tap “Save Current Filter” to save the combination as a named preset. Quickly apply saved filters later without re-selecting all the criteria. Long-press to rename, swipe to delete. See Filtering Your Collection for details.
8. Custom CSV Import via Desktop Apps
Import items via CSV files using the desktop apps’ built-in import tool. See our CSV Import Tutorial for instructions.
9. Set Public Username for Web
Set a custom display name for your shared collection URLs instead of showing your email. Access this from the Pro tab — tap the display name field to edit it. Must be 1-24 characters using letters, numbers, spaces, underscores, or hyphens.
10. Priority Support
Email priority@icollecteverything.com for direct access to our priority support team with faster response times.
11. Upcoming Feature Voting
Access from the Pro tab. Help decide what features get built next! Drag-and-drop to rank 13 proposed features by importance. The list is randomly shuffled on your first visit to avoid bias, and your ranking is sent to us to guide development priorities.
12. Pro User Achievement
Automatically unlocks the exclusive “Professional Collector” mystery achievement badge.
13. Free Gift to a Friend
Access from the Pro tab. Get a one-time promo code to give a friend an unlimited collection unlock for free. Tap the Gift button and share it via text, email, or any other method. Can only be used once per account.
14. No Promotional Notifications
Toggle on from the Pro tab to opt out of any promotional push notifications. You’ll only receive important app updates.
15. Web Privacy
Toggle on from the Pro tab to make your collection completely private. Hides your collection from the web, removes Share Collection/Wishlist from the menu, and disables item sharing.
16. 26 Additional Theme Colors
Access all 26 color themes beyond the default Blue, each with light and dark variants: Red, Orange, Yellow, Green, Purple, Pink, Maroon, Salmon, Lavender, Navy, Sky, Teal, Mint, Army, Brown, Tortilla, Gray, Pearl, and Charcoal.
17. Dark or Light Mode Anytime
Go to ☰ Menu > Settings > Themes to manually choose dark or light mode regardless of your iPhone’s system setting, or set it to follow the system.
18. Purchase Price Totals
See the total of what you’ve actually spent on your collection at ☰ Menu > Collection Value. Fill in the “Purchase Price” field on each item to track what you paid.
19. Collection Valuation Difference
Compare your estimated values vs. purchase prices to see your profit or loss with directional indicators (▲ profit, ▼ loss, ≡ no change).
20. Unlimited Custom Collections
Create as many custom collection types as you want. Free users are limited to 1 custom collection. (iCollect Everything app only)
21. Rename Built-In Collection Types
Long-press any collection name on the Switch tab to rename it. Your custom name syncs across devices. (iCollect Everything app only)
100 Free AI Scans
Pro users also receive 100 free AI scan credits (compared to 15 for free users) for AI Lookup and AI Auto-Fill features.
Future Planned Pro Features
More features are in development. Pro users can vote on which ones get built first via Feature Voting:
- Edit items on the web
- Graphs of item value changes over time
- Projected future values
- Automated insurance letter PDF generation
- Export images as a ZIP file
- Bookshelf view theme
- Unlimited color wheel theme
- All app settings stored in the cloud
- Wishlist release date notifications
- Admin data correction ability
- Live chat support
- CGC Comics Grading Scanner (Comic Books app only)
- Change icons on Switch tab (iCollect Everything app only)
29. In-App Purchases & Unlocking Collections
The free version of iCollect Everything lets you try every collection type with a limited number of items per collection. When you reach the free item limit for a collection type, the app will show an upgrade prompt letting you know your options — you can unlock that specific collection, buy all collections, or subscribe to Pro. You can still browse, edit, and manage your existing items, but you won’t be able to add new ones until you unlock.
There are several ways to unlock unlimited access:
Purchase Options
- Individual Collection Unlock — A one-time purchase to permanently unlock unlimited items for one specific collection type.
- Buy All Collections — A one-time purchase to unlock every collection type at once. The price is dynamically discounted based on any individual collections you’ve already purchased — so you’ll never pay for the same thing twice.
- Pro Subscription — An annual subscription that unlocks everything (all collections + all 21 Pro features). See Pro Subscription — Complete Guide above.
- AI Scan Credit Packs — One-time purchases for additional AI scan credits (50, 250, or 500 scans).
For a detailed price comparison of all options, visit our pricing and product breakdown page.
How Dynamic Pricing Works
The “Buy All” option gets cheaper the more individual collections you’ve already purchased:
- 0 prior purchases: Full price
- 1 prior purchase: A discount is applied to reflect your previous purchase
- 2+ prior purchases: An even bigger discount is applied
Restoring Purchases
If you’ve reinstalled the app or gotten a new device, go to ☰ Menu > Restore Purchases to restore any previous purchases tied to your Apple ID. Make sure you’re logged into the same Apple ID you originally purchased with.
30. All Settings Explained
Access from ☰ Menu > Settings. Here’s a complete guide to every setting available:
Customization
- Customize Cell Data — Choose which fields display on item cards in your collection list (up to 5 label positions: 3 subtitles + 2 labels). Set separately for collection and wishlist.
- Customize Data Fields — Show or hide fields on the item detail view, plus toggle “Hide Empty Fields” (on by default). Up to 31 fields per collection.
- Title Format — Move “The” and “A/An” to the end of titles for better alphabetical sorting
- Default Field Data — Set default values that pre-fill when creating new items (currency, country, format, etc.)
- Switch Tab — Show or hide collection types on the Switch tab
- Themes — Change color theme and light/dark mode
Gesture Controls
- Shake to Select — Shake your iPhone to randomly pick an item from your collection. Great for “what movie should I watch tonight?” or “which game should I play?” Fun to discover items you may have forgotten about!
Image Settings
- Save Images Locally — Cache images on your device for offline viewing and faster loading. Uses more storage when enabled. When off, images load from the internet each time.
- Round Image Corners — Apply rounded corners to thumbnails in your collection list. On by default.
Display Options
- Tab Bar Badges — Show or hide the item count badges on the Collection and Wishlist tab bar icons. On by default.
- Section Counts — Show the number of items in each section header (e.g., “Action (12)”, “Comedy (8)”).
Camera
- Rectangle Cropping — Automatically detect and crop rectangular items (stamps, cards, etc.) when taking photos. Uses document scanning to find edges, straighten, and crop.
Scanning
- Scanning Sound — Play a beep sound when a barcode is successfully scanned.
AI
- AI Deep Mode — Enable enhanced AI analysis with extensive web research across 5-7+ sources. Uses 2x scan credits but delivers more thorough and accurate results.
- Black Backgrounds — Use black instead of white backgrounds for AI image cleanup processing.
Name Format
- Last Name First — Display people’s names as “Smith, John” instead of “John Smith”. Useful for collections with many people fields (actors, directors, authors).
Auto Input
- Set a default adding method so the app automatically opens your preferred add method (barcode scanner, manual barcode, database search, or bulk scanner) when you tap +. Set separately for collection and wishlist. Default is “Off” (choose each time).
31. Frequently Asked Questions
How many items can I add for free?
Free users can add a limited number of items per collection type. To add unlimited items, you can purchase an individual collection unlock, the Buy All option, or subscribe to Pro. See our pricing and product breakdown page for details.
Does this app let me play/watch/listen to my media?
No — iCollect Everything is a cataloging and database app for organizing and tracking your collection. It doesn’t play movies, stream music, read books, or run video games.
My collection disappeared! What do I do?
Don’t panic! Try these steps:
- Go to ☰ Menu > Reload Collection to force a refresh from the server. This clears your local cache and re-downloads everything.
- If that doesn’t work, log out and log back in (☰ Menu > Account > Log Out, then ☰ Menu > Log In)
- Make sure you’re on the correct collection type (check the Switch tab)
- Check if you have filters active — the “Filters Set” indicator would be visible. Clear your filters via ☰ Menu > Filter > Reset All Filters.
- If the problem persists, contact us at support@icollecteverything.com
How do I delete an item?
Swipe left on any item in your collection list to reveal the delete button. Or open the item, scroll to the bottom, and tap Delete. For bulk deleting, tap the Bulk icon in the toolbar, choose “Bulk Delete”, select items, then tap “Delete Selected” (Pro feature). See Bulk Actions for the full walkthrough.
How do I delete or change an image?
The first image on an item can be replaced but not deleted. To change it, edit the item, tap the image area, and choose a new image for that slot. Additional image slots (2-10) can be cleared or replaced.
How do I import my collection from a spreadsheet?
Email your CSV file to support@icollecteverything.com and we’ll process the import for you. Pro users can also use the CSV Import tool in the desktop apps.
Can I export my collection images?
Exporting images as a batch is not currently available, but it’s on our roadmap as a future Pro feature. For now, you can use the Share button on individual items to get web URLs where images can be saved, or view them on icollecteverything.com.
How do I show or hide collection types on the Switch tab?
Go to ☰ Menu > Settings > Switch Tab and toggle collection types on or off with the checkmarks.
How do I print my collection or export it as a PDF?
Share your collection URL (via ☰ Menu > Share Collection), open the link in a web browser, and use your browser’s Print function to print or save as PDF.
How do I back up my collection?
Create a free cloud sync account (☰ Menu > Log In > Create Account). Your collection is automatically backed up to the cloud whenever you save changes. You can also export to CSV as an additional backup.
Can I view my collection online?
Yes! Share your collection (☰ Menu > Share Collection) and open the link in any web browser to view it at icollecteverything.com. You can also log in on the website directly.
What languages does the app support?
The app interface is currently available in English and German, and the app automatically uses whichever language your device is set to. More languages will be coming in the future. Data entry supports any language — you can type item titles, notes, and other details in any language you prefer. To change the app language, go to ☰ Menu > Change App Language, which takes you to your iPhone’s language settings for the app.
How do I customize what fields show on my collection list?
Go to ☰ Menu > Settings > Customize Cell Data. You can choose which fields appear in each of the 5 label positions (3 subtitles + 2 labels) on your item cards.
How do I hide fields I don’t use?
Go to ☰ Menu > Settings > Customize Data Fields and toggle off any fields you don’t want to see. You can also tap Show/Hide Fields at the bottom of any item’s detail view. Enable “Hide Empty Fields” to automatically hide any field that has no data.
What does “Reload Collection” do?
☰ Menu > Reload Collection forces a complete refresh of your collection data from the server. It clears all locally cached data and images, then re-downloads everything fresh. Use this if your collection seems out of sync or items are displaying incorrectly.
What about the “3D” badge on movies?
Some movie collections include a “3D” field. When this is enabled for an item, a “3D” badge appears on the item’s detail view to indicate it’s a 3D Blu-ray or 3D format.
Can I have multiple collections of the same type? (e.g., three different Toy Car collections)
The Switch tab only shows one entry per collection type, so you can’t create separate “folders” for the same type. However, you can achieve the same result using the Collection field and Filters. Here’s how:
- When adding or editing items, fill in the Collection field with a name for each sub-collection (e.g., “Hot Wheels”, “Matchbox”, “Johnny Lightning”)
- Go to ☰ Menu > Filter
- Filter by the Collection field and select the sub-collection you want to view
- Pro users can save this filter as a preset (e.g., “My Hot Wheels”) for one-tap switching between sub-collections
This gives you the same effect as having multiple collections of the same type — you can quickly switch between them using saved filters.
Can I move an item from one collection type to another? (e.g., from Movies to Video Games)
No — items cannot be moved between different collection types because each type has its own unique set of fields. A movie has fields like Director, Runtime, and Studio, while a video game has fields like Platform, Publisher, and ESRB Rating. These field structures are too different to transfer data between them. If you need an item in a different collection type, you’ll need to add it again in the correct type.
You can move items between your Collection and Wishlist within the same type — see Using the Wishlist.
The app says it’s in “Maintenance Mode” — what should I do?
Occasionally our servers undergo scheduled maintenance. During this time, you can still browse your locally-cached collection, but you won’t be able to save changes or search the database. Simply close the app and try again later — maintenance is usually brief. There is no need to contact us about this message.
I’m getting an error code — what does it mean?
Error codes (like PRO1, PL1, DE1, etc.) are diagnostic codes that help our support team identify issues quickly. If you see one, please email support@icollecteverything.com with the error code and we’ll help you resolve it.
32. Contact & Support
General Support
Email: support@icollecteverything.com
Available from within the app: ☰ Menu > Contact Us
(The app will ask if you’ve read the FAQ first — if you haven’t, it’ll open the FAQ for you.)
Priority Support (Pro Users)
Email: priority@icollecteverything.com
Available from the Pro features screen
Pro Users: How to use the CSV Importing tool in the desktop apps.
Connect With Us
- Website: icollecteverything.com
- Facebook: Like us on Facebook (or ☰ Menu > Like on Facebook in the app)
- X (Twitter): Follow us on X (or ☰ Menu > Follow on X in the app)
- App Store: Leave a review on the App Store — it really helps!
Pricing & Product Information
For a detailed breakdown of all our product offerings, pricing tiers, and what’s included, visit: Price Differences and Breakdown of Our Product Offerings
Other iCollect Apps
In addition to iCollect Everything (which supports all collection types), we also offer focused single-collection apps for collectors who only need one type:
- Media: iCollect Movies, iCollect Books, iCollect Music, iCollect Comic Books, iCollect Video Games
- Trading Cards: iCollect Trading Cards
- Collectibles: iCollect Action Figures, iCollect Toy Cars, iCollect Vinyl Figures, iCollect Shoes, iCollect Stamps, iCollect Coins, iCollect Ornaments, iCollect Wine
All apps sync through the same cloud account, so your data is always accessible no matter which app you use.
iCollect Everything — The best collection database app for cataloging any collectible you can think of.
Available on all your devices: